Monday, August 31, 2009

Oaxacan Grilled Shrimp with Mexican Rice

These shrimp were sooooo good and the rice was amazing -fluffy and flavorable.


Printable Recipe

For the rice (Note: Start the rice first if you are also making the shrimp recipe):

  • 12 ounce can diced tomatoes
  • 1 medium white onion
  • 3 medium jalapeños, minced
  • 2 cups long grain white rice
  • 1/3 cup canola oil
  • 4 minced garlic cloves
  • 2 cups chicken broth
  • 1 1/2 t salt
  • 1/2 cup fresh cilantro, minced
  • 1 lime

1. Preheat oven to 350° F.

2. Put tomato and onion into blender and pureé. Reserve 2 cups.

3. Place rice in a strainer and rinse under cold water until water runs clear. This make take several minutes, but it is critical that you rinse all the starch off of the rice. Shake rice vigorously to remove excess water.

4. Heat oil in an ovensafe pan or Dutch oven that has a tight fitting lid for about 2 minutes. Drop a few grains of rice into the oil. They will sizzle when the oil is ready. Add rice and fry for 6-8 minutes, until the rice is lightly golden. If you are also making the shrimp recipe below, begin marinating the shrimp now.

5. Reduce heat to medium, add garlic and 2 of the jalapeños and cook, stirring constantly until fragrant, about 2 minutes.

6. Stir in broth pureéd tomato mix, and salt. Increase heat to medium high and bring to a boil.

7. Cover pan and transfer to oven until rice is tender and all liquid has been absorbed, about 30 minutes. Stir and check after 15 minutes. If you do not have a tight-fitting lid you may have to add a small amount of water. If you are also making the shrimp, put them on your preheated grill about 5 minutes before the rice is done. The rice will be done before the shrimp, but it'll need a few minutes to cool slightly before serving.

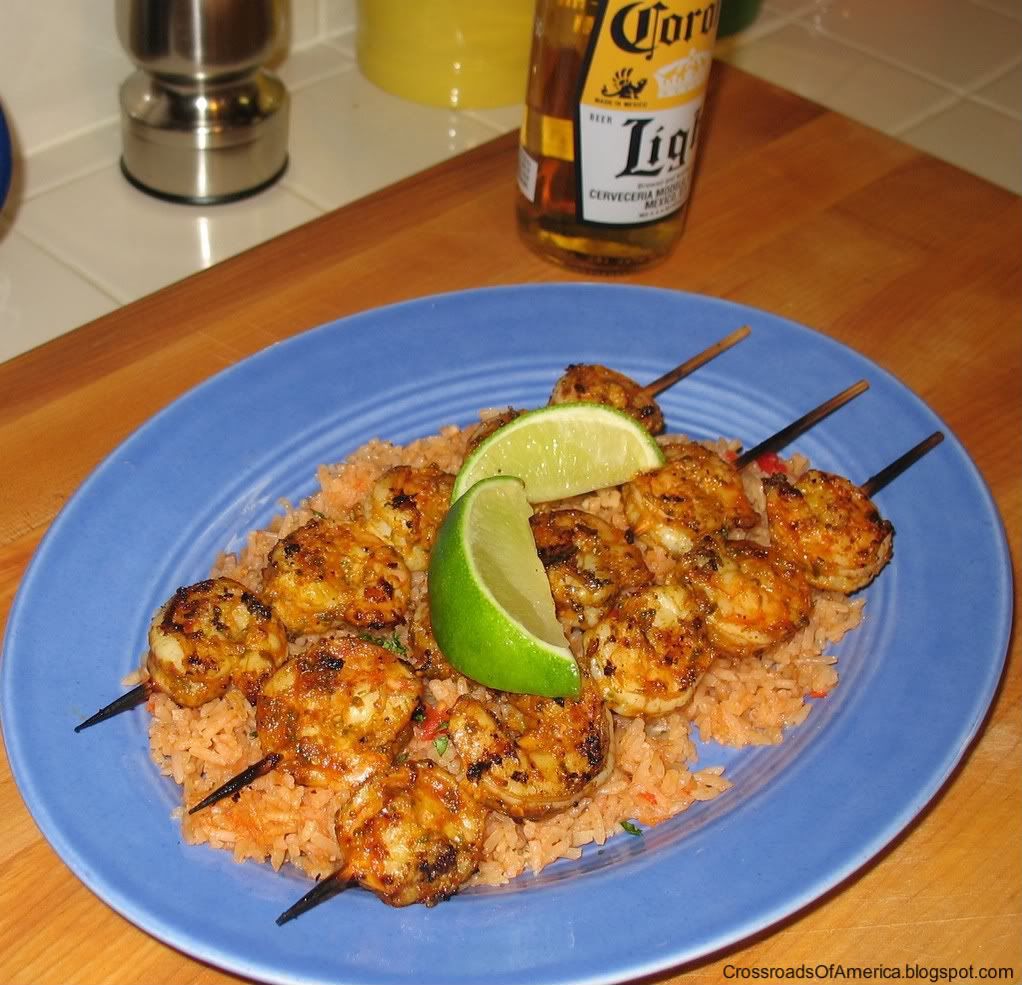
8. Stir in cilantro and last two jalapeños (to taste). Squeeze fresh lime wedges over top of rice (and shrimp) and serve.
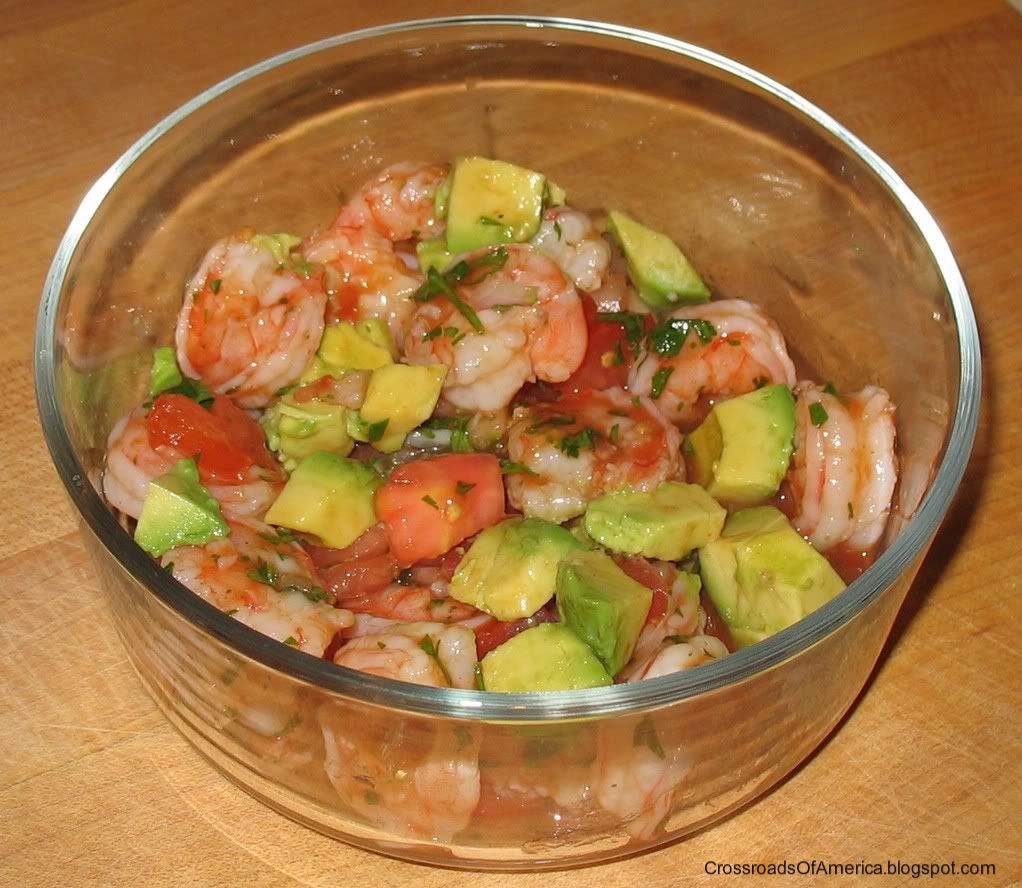
For the shrimp:

  • 2 pounds of large shrimp, cleaned and deveined
  • 1/2 cup olive oil
  • 1/2 cup lemon juice (you can also use lime juice)
  • 1/2 cup fresh parsley
  • 1/3 cup fresh cilantro
  • 4 t garlic, minced
  • 1 T paprika
  • 2 t ground cumin
  • 3/4 t crushed red pepper flakes
  • 1/2 t salt
  • 1/4 t pepper
  • wooden skewers

1. Soak skewers in water.

2. Throw all ingredients except the shrimp into a blender and process until pureéd.

3. Stir shrimp and marinade together in a large bowl, cover and chill for 30 minutes.

4. Drain shrimp and reserve marinade. Thread shrimp on skewers.

5. Grill shrimp over medium high heat until they just turn pink, turning frequently and brushing with reserve marinade up until when the shrimp are half done. Total cook time will be 10-15 minutes.

Sunday, August 30, 2009

Grilled Potato Salad

Super easy potato salad without all the mayo, so it's great for picnics!


Printable Recipe

Ingredients:

  • 1 envelope Lipton Onion Soup Mix (or onion-mushroom)
  • 1/3 cup olive or vegetable oil
  • 2 T red wine vinegar
  • 1 clove garlic, chopped fine
  • 2 pounds small red potatoes cut into 1" cubes
  • 1 T fresh chopped basil (or 1 t dried basil, crushed)
  • Pepper

1. In a large bowl mix the soup mix, oil, vinegar and garlic. Add the potatoes and stir until covered.

2. Spray a large foil pan with cooking spray. Add potato mix and spread evenly. Cover with another sheet of foil. (You can also cook the potatoes in foil. Just make a packet and close tightly.)

3. Grill over indirect heat for about 40 minutes or until the potatoes are tender. Turn and shake the package every 10 minutes as they cook.

4. Spoon potatoes into a large bowl and toss with basil and pepper. Serve slightly warm or at room temperature.

Saturday, August 29, 2009

USS Scamp

In the late 70s, when I was living in Lima, Peru, the USS Scamp came to visit. I think they were doing a South American tour at the time. As a teen, going on the sub was one of the neatest things I'd ever done.

We took a small boat out to the sub and got a great tour. All the guys on board were nice, and answered all my nosy questions. Well, except the ones like 'How long can you stay under water?' and 'How many missiles do you carry?'.

It was a great experience, and when I was leaving the captain gave me this awesome USS Scamp pocketknife that I still have, in the original box.

The USS Scamp SSN-588 was decommissioned in 1988. There is a great website here. The sub she is named for (SS-277) was sunk south of Tokyo Bay in 1944. There is an excellent history of the original sub on Wikipedia.

Thank you to all that serve!

Friday, August 28, 2009

Paprika Chicken with Sour Cream Gravy

I was jonesin' for comfort food the other day, so I made some. It's kind of hard to tell, but under that mound of gravy is a juicy, tender chicken breast. Served with roasted green beans and red potatoes. This has always been a favorite in our house!


Printable Recipe

Ingredients:

  • 1/2 cup flour
  • 2 t paprika
  • 1 t salt
  • 1 t pepper
  • 1 t garlic powder
  • 1 t cayenne pepper
  • 4 boneless skinless chicken breasts
  • 1/4 cup butter
  • 1 (10 1/2 oz) can cream of chicken soup
  • 1/4 cup sliced green onions
  • 8 oz sour cream

(Note: I butterfly and tenderize the chicken breasts before starting.)

1. Combine flour and seasonings in a plastic baggie.

2. Add chicken to bag and shake to coat.

3. Melt butter in a large skillet.

4. Brown chicken in butter, about 4 minutes per side.

5. Add soup and onions to skillet.

6. Cover and cook over low heat for 10 minutes or until chicken is done.

7. Stir in sour cream. Heat slightly then serve.

Wednesday, August 26, 2009

Deep-Fried Okra with a Scallion Dipping Sauce

Oh yes! We were thinking we loved deep-fried pickles, but these deep-fried okra have taken over the top spot! We had these with some Scott's BBQ-sauced grilled chicken breast sammies topped with lettuce, tomato, red onion, and Muenster cheese. Yum-o-lishus!


Printable Recipe

For the batter:

  • 1 cup all-purpose flour
  • 1 cup cornstarch
  • 1 T sugar
  • 16 oz soda water

For frying:

  • Peanut oil
  • 2 pounds fresh okra, stem removed and cut in half
  • 3 T Cajun seasoning
  • 1 cup all-purpose flour
  • Salt


For the scallion dipping sauce:

  • 1 t cayenne pepper
  • 16 oz sour cream
  • 1 cup chopped scallions
  • 1/4 cup honey
  • 1 t salt

1. Whisk batter ingredients together and chill.

2. Heat oil in deep fryer or Dutch oven to 375°.

3. In a shallow pie plate, mix flour and 1 tablespoon of the Cajun seasoning.

4. Season okra with remaining 2 tablespoons of Cajun seasoning.

5. Dip okra in seasoned flour and then in the batter and place into heated oil. Fry until golden, about 4 minutes. Remove to a paper towel-lined plate or tray and season with salt.

6. To make the dipping sauce, mix all ingredients well.

Tuesday, August 25, 2009

Our sunflowers

Not to be outdone by my dad's sunflowers, we planted some of our own!

To recap, here are dad's piddly, dinky, little old sunflowers:

And here are our super-duper, California redwood-like sunflowers!

Plus, I get extra style points for wearing white socks with blue Crocs! Woo hoo!

Baconnaise and a BLT

What could be better on a BLT then bacon-flavored mayonnaise?

The bacon flavor isn't overwhelming. We spread some on toasted bread along with regular mayo, thick-sliced bacon, lettuce and a fresh heirloom tomato. Fantastic!

Monday, August 24, 2009

1965 Chevy C-10 Pickup

This was my dad's truck up until a few years ago. He bought it used in 1966, I believe. Same day my papa bought the same truck, except with a long bed.

It was originally a tan color. Then, around 1976 dad tore it down and re-painted it royal blue.

Later... I'm not sure when, it ended up primer redish brown.

When I went off to college my folks moved to Paraguay. My cousin (I was working on his family's dairy farm at the time) and I decided to overhaul the old girl. Put in a really nice new wood bed, and painted it.

It wasn't too bad from the front. You don't see many red and silver-flamed trucks.

The side and back were... well, not as good as the front.

I think those are Ford hubcaps. Hey, I was a broke college kid! The hand airbrushed tailgate lettering was a little rough. I do like the white Chevy emblems on the taillights, though.

Somewhere around 1987 the engine (a 230 straight 6) seized up on me. I found an old 235 in a salvage yard and had it rebuilt and dropped it in. It was still going strong when dad sold the truck around 2005 or so. She was pretty rotted out by then, but still a classy old truck.

I miss the old 3-on-the-tree shifter. Ever since dad bought her there was an issue with the transmission where you couldn't shift until the engine was really warm on a cold day. So, you had to remember to park in whatever gear (usually 2nd) you planned on using the next morning.

Sunday, August 23, 2009

Tex Mex Shrimp Cocktail Salad

This was a tasty, refreshing, quick salad to make. I think it might even be better using grilled shrimp, so I'll try it that way next time.


Printable Recipe

Ingredients:

1 pound medium shrimp, peeled and tails removed (I used 26-30s)
1/4 cup ketchup
1/4 cup fresh lime juice (about 1 lime)
1-2 t hot pepper sauce (I used Frank's)
1/4 cup chopped red onion
1/2 cup chopped tomatoes
2 T chopped cilantro (or more, to taste)
2 avocados, chopped

1. Bring a medium pot of water to a boil. Add shrimp and cook until pink and opaque, about 1-2 minutes. Remove shrimp from water and place in colander. Rinse under cold water and then drain.

2. Place cooked shrimp in a mixing bowl and add the red onion, tomatoes and cilantro.

3. In a small bowl, combine the ketchup, lime juice and hot pepper sauce. Stir.

4. Pour sauce over shrimp mixture and toss lightly to coat. Chill about about hour.

5. Add chopped avocado and toss just before serving.

Thursday, August 20, 2009

Egg sandwich on toasted jalapeño buns

Breakfast for dinner is such a great thing!

Tonight I fried up a few eggs and threw them on some toasted jalapeño buns from last night. Added some sharp cheddar and bacon (and a little butter!). Yum-0-lishus!

Wednesday, August 19, 2009

Grilled Burgers on Jalapeño Buns, Corn and Tomato Pasta

Oh, what a night! We're dodging some bad storms this evening, but we were able to put together a decent dinner.

We made some jalapeño burger buns from scratch. Topped them with some grilled burgers and a mustard slaw mix. On the side, a corn and tomato pasta! Yummy!


Printable Recipe

For the buns:

  • 2 Jalapeño peppers, charred on grill and chopped fine
  • 2 1/4 cups all-purpose flour
  • 3/4 cup Masa de Harina
  • 1 t salt
  • 1 1/2 t yeast
  • 2 t honey
  • 1 1/2 cup water (or less, see comments below)

1. Put all but the jalapeños in a bowl and mix for about 3 mintues.

2. Add the jalapeños and mix for about 30 seconds.

3. Cover and let rise about 1 hour.

4. Punch down, cover again, and let rise another hour.

5. Roll out to 1/2" to 3/8" thickness. Use 4" cup to cut into discs.

6. Let rise another 5 minutes.

7. Brush lightly with EVOO.

8. Grill, approximately 2-3 minutes per side. Serve open-faced or halve the buns.

Note: The jalapeños add a lot of moisture to the dough mixture. It's easy to want to add more water to the mixture at first, but you should hold off and let the water from the jalapeños moisten it.

For the slaw:

  • 2 T oil
  • 1/4 cup sugar
  • 1/4 cup cider vinegar
  • 1 T mustard
  • 1/2 t salt
  • 1/4 t pepper
  • 1 pound cole slaw mix

1. Combine oil, sugar, vinegar, mustard, salt and pepper in a a small saucepan. Simmer over medium heat for 3 minutes.

2. Put Cole slaw mix in a bowl. Toss with hot dressing. Let stand for 20 minutes.

For the corn and tomato pasta:

  • Salt
  • 1 pound bow-tie pasta
  • 2 T EVOO
  • 2 garlic cloves, minced
  • 1 pint cherry tomatoes
  • 3 ears fresh corn, kernels cut off
  • 2 T unsalted butter
  • 1/4 cup fresh basil leaves, chopped

1. Bring a large pot of salted water to a boil and cook the pasta until al dente, drain.

2. In a large skillet heat the olive oil over medium heat. Add the garlic and tomatoes and cook until tomatoes are softened. Stir while cooking, but be careful not to damage the tomatoes. Add the corn and cook until the corn is heated through and golden. Season with salt.

3. Add the vegetable mix to the pasta and toss lightly.

Tuesday, August 18, 2009

Green Bean and Roasted Corn Salad

Farm-fresh corn really made this salad taste great.


Printable Recipe

Ingredients:

  • Water, to cover beans
  • 4 cups green beans, ends cut
  • 2 ears corn
  • 2 T olive oil
  • 1 large red onion cut into rounds
  • 2 T chopped garlic
  • 1/4 cup white wine
  • 2 t salt
  • 1 t black pepper
  • 3 T butter
  • 1/4 cup diced Roma tomatoes
  • 3 T grated Parmigiano-Reggiano

1. In a medium sauce pot bring water and 1 teaspoon salt to a boil. Add green beans and blanch for about 3 minutes. Remove and put into an ice bath. Drain.

2. Heat grill. Place corn cobs on grill. Brown all around. Let cool and remove the kernels.

3. Heat oil in a large saute pan over medium heat. Add onions and saute for 4-5 minutes. Add green beans, corn, and garlic and saute for 4 minutes.

4. Deglaze pan with wine, season with salt and pepper and butter.

5. Garnish with Roma tomatoes and Parmesan cheese.

Sunday, August 16, 2009

Harley

Our big boy Harley, is featured on the Jake and Micah blog in the monthly Purr Files. This is one of my favorite blogs. Very well done and Mei makes the coolest cat toys. I ordered some fortune cookies and some sushi rolls for all the kitties. Very cute and very creative. The cats love these toys. They have high-quality catnip inside. If you have kitties, order some of these neat toys.

Smoked Pork Butt BBQ

Anita picked up 2 butts on Thursday. One was about 9 pounds and the other was about 7 pounds after a little bit of trimming. Early Friday morning I rubbed them down with some Dizzy Pig coarse grind rub and let them sit in the fridge for a while.


I started up the charcoal chimney at 6:30 PM Friday. I also put a full chimney of unlit coals in the Weber Smoky Mountain (WSM) and added a few handfuls of chunk charcoal.

When the chimney was glowing hot I added the coals to the WSM along with some hickory chunks. It took about 45 minutes for the smoker to get a stable 230°, which is where I like it to be.

I put the two butts on the smoker (heaviest on the bottom rack, above the water pan) and put the wireless thermometer in. I checked the temps about every 2 hours through the night, although I wasn't doing a good job early in the morning. The air temp in the WSM had dropped to 190° and the meat temp on the top rack was only about 150°.


I threw some more lump charcoal on, and got the temps up to just about 275°. A little higher than I'd normally run, but time was running out!

At 9:30 AM I pulled both butts off as the internal temps hit 190°. They were so tender and moist! I was panicking but everything was ok! I wrapped them in foil and put them in my meat cooler along with towels and 2 foil-wrapped bricks that I'd heated in a 350° oven for about 30 minutes. We had a 2 hour drive ahead of us. I've found that the bricks and towels keep it well above 160° for the entire time. Perfect.


Got to my FIL's and proceeded to pull the pork. I took about 1/3rd of the pork and put it into a food processor for a really quick grind, then mixed it back into the pulled pork. I think this adds a different texture that really holds the sauce (I brought about 2 quarts of my homemade sauce).

Everyone there said the sauce and BBQ was fantastic. Best that I'd ever done! I'm glad it came out great for my FIL's 88th birthday!

Saturday, August 15, 2009

Butterscotch and Black Pepper Carrots

This is a lot like your traditional stovetop carrots, but the extra black pepper really adds a nice kick to it.


Printable Recipe

Ingredients:

  • 2 1/2 T butter
  • 2 1/2 T packed light brown sugar (we used Splenda)
  • 1/4 t kosher salt
  • 1 pound baby carrots, halved lengthwise
  • 1 T freshly ground black pepper

1. In a medium skillet on medium-high heat, heat the sugar, butter and salt stirring until smooth.

2. Add the carrots and toss to coat. Cover and reduce heat to medium.

3. Simmer for 15 minutes or until carrots are tender and glazed.

4. Top with fresh ground black pepper.

5. Serve hot or warm.

Thursday, August 13, 2009

Homemade BBQ Sauce

This is a sauce that I got mostly from a recipe from Wolfgang Puck. It is a family favorite. I'm getting ready to smoke 16 pounds of Boston butt tomorrow night (all night) for my FIL's 88th birthday, and this sauce will be the only one we'll need.

We start out with a few veggies thrown onto the smaller Weber Kettle. Let them char up good. Our jalapeño garden this year is producing only tiny peppers, but they'll do. I have to tone down the heat for the family, so I used just 4 small ones. The tomato at the top was grilled for some roasted tomato aioli, which I'll post later.

Everything gets chopped up and goes into the pot along with some liquid ingredients and spices.


Finally, we blend everything together until smooth and thick! Yummy!

Printable Recipe

Ingredients:

  • Vegetable oil
  • 3 red onions sliced into thick rounds
  • 3 red bell peppers, cored
  • 2 apples cored and quartered
  • 8 jalapeños or chilies of choice
  • 2 cups red wine vinegar
  • 1/4 cup Worcestershire sauce
  • 1 1/2 cups molasses
  • 3 1/2 cups ketchup
  • 1 cup tomato paste
  • 1 cup packed brown sugar
  • 1 1/2 T salt
  • 1 T ground coriander
  • 1 T ground cinnamon

1. Toss the onions, peppers and apples in oil to coat well then put onto preheated grill for about 15 minutes until well charred and starting to soften.

2. Remove vegetables and give them a rough chop. Remove seeds from the peppers if you wish.

3. In a large pot put the vegetables and remaining ingredients. Stir well and simmer for 20 minutes.

4. Let cool slightly and puree. We use an immersion blender for this step. It seems to work best.

You'll get about 3 quarts of sauce from this recipe.

Wednesday, August 12, 2009

Black-eyed Pea Dip

I think this can be used as a dip or a salad, really. It is very good on tortilla chips.


Printable Recipe

Ingredients:

  • 2(15 oz) cans black-eyed peas, drained
  • 1 (15 oz) can whole kernel corn, drained
  • 1 (10 oz) can spicy canned tomatoes, chopped
  • 1 cup chopped red bell pepper
  • 1 cup chopped green bell pepper
  • 2-3 T chopped fresh jalapeño
  • 1/4 cup chopped yellow onion
  • 1 (4 oz) jar chopped pimentos, drained
  • Corn or tortilla chips for serving

For the dressing:

  • 1/2 cup red wine vinegar
  • 1 T balsamic vinegar
  • 1 t salt
  • 1/2 t fresh ground pepper
  • 1 T Dijon mustard
  • 1/4 t sugar
  • Pinch dried oregano
  • 1/2 cup olive oil
  • 1/2 cup vegetable oil

1. In a large bowl, combine the peas, corn, tomatoes, red, green and jalapeño peppers, onion and pimentos.

2. In a container with a lid (a jar works well), combine the wine, balsamic vinegar, salt, pepper, mustard, sugar, oregano, and oils. Shake well.

3. Add dressing into pea mixture and stir gently. Refrigerate over night before serving

Tuesday, August 11, 2009

Buck Creek Winery, Indianapolis Indiana

We are not wine aficionados, but we do enjoy a nice glass of wine every now and then, mostly during cooler weather. During the summer we tend to accumulate bottles of wine from Indiana wineries for enjoyment in the cooler seasons.

I believe it's important to support Indiana's wineries. We're slowly learning the lingo and how the wines are made, and getting to know the people at the various wineries. We're also learning more about what we like, and how the different grapes affect the wines. It's an interesting science.

This last weekend we stopped by Buck Creek Winery on the way back from Metamora. They have a nice place right off I-74 just as you're entering Indianapolis.

We like the drier, less sweet wines. Buck Creek has several. After sampling a few, we decided on their Chardonnay and Pinot Grigio. Again. I think the last time we stopped there (in early spring) we also ended up with a few bottles. And then some.

It's always nice to spend a little time tasting and talking with the folks at the winery. They are always helpful and eager to answer any questions you have. Stop by if you're in the area, you won't be disappointed.

Monday, August 10, 2009

Spicy Roast Beef Sandwich Dip

This is somewhat like a French dip, but with some kick! We really liked it. We used some jalapeños from our garden. They're rather small this year, but they are very tasty.


Printable Recipe

For the sauce:

  • 1 (10oz) can chopped tomatoes with diced green chiles
  • 2 (8oz) cans tomato sauce
  • 1/4 cup chopped fresh cilantro
  • 2-3 chipotle chiles in adobo, seeded and chopped (or leave the seeds in)
  • 2 t adobo sauce from canned chipotles
  • 1 lime, juiced
  • 1 t salt
  • 1 cup low-sodium beef broth

For the meat:

  • 2 T oil
  • 1 large onion, sliced thinly
  • 4 garlic cloves, minced
  • 2 jalapeños, seeded and minced
  • 1 pound deli roast beef, rare and sliced thin
  • 1 avocado, smashed
  • 4 sub buns, toasted
  • Sliced/Shredded Monterrey Jack cheese or Swiss

1. In large saucepan over medium heat combine tomatoes, tomato sauce, chipotles and adobo sauce, lime juice, cilantro, and salt. Bring to a simmer then lower heat and cook for 15 minutes, stirring.

2. In a large skillet add oil and heat, then add onions. Cook until onions begin to soften, about 3-5 minutes.

3. Add garlic and jalapeño. Stir, and cook for 3-4 minutes until onions are starting to brown.

4. Add roast beef and toss. Heat thoroughly. Add 3/4 - 1 cup of sauce, tossing more.

5. Remove sauce (in saucepan) from heat and add beef broth. Puree using immersion blender.

6. In toaster oven or under broiler, brown buns. Top with cheese and return to heat to melt.

7. Spread smashed avocado evenly onto buns.

8. Ladle sauce into bowls.

9. Top buns with meat mixture.

Dip the sandwiches into the sauce and enjoy!

Sunday, August 9, 2009

Chicken Prosciutto and Roasted Green Beans

This was my first time making this chicken recipe.It came out very tasty. I had planned on also making fried potatoes, but forgot about them so we ended up with just the roasted green beans on the side.


Printable Recipe

For the chicken you'll need:

  • 4 skinless chicken breast halves
  • 1 stick unsalted butter
  • 1 T sage
  • 1/4 pound thinly sliced prosciutto
  • 2 eggs, beaten
  • 8 thin slices Fontina cheese (about 2 oz)
  • S & P

For the sauce you'll need:

  • 1 cup dry white wine
  • 1/2 T sage
  • 1/2 stick unsalted butter, chilled

1. Butterfly each breast by cutting in half, horizontally. Pound with mallet until 1/8" thick. Season with S & P and set aside.

2. Heat butter over medium heat in large sauté pan. When butter foams, add sage and cook for 1 minute, stirring.

3. Wrap each chicken breast in prosciutto.

4. Dip each breast in egg, coating well. Place in pan (do not crowd. Work in batches if you need to) and cook for 2 minutes on each side until just past pink on the inside. Remove.

5. Place chicken on flat baking sheet and cover each with a slice of Fontina. Place under preheated boiler until cheese just melts.

6. While the cheese is melting, pour the butter from the sauté pan and add the white wine. Reduce to 1/2 cup over high heat. Add sage and cook for 1 minute. Add chilled butter, reduce heat to low and melt.

7. Pour sauce over and around chicken and serve.

For the roasted green beans:

  • 1-2 pounds fresh green beans
  • S & P
  • Olive oil

1. Preheat oven to 425°.

2. Mix beans with olive oil.

3. Spread beans over sheet pan and sprinkle liberally with S & P.

4. Roast for 20-25 minutes, or until starting to blacken.

Saturday, August 8, 2009

Metamora Indiana Grist Mill and Town

We took a nice back-roads country ride over to Metamora today. It's about 1 1/2 hours from here.

Along the way we passed many farmhouses and fields green with corn and soybeans. I took a few shots and decided to convert them so they look like tin-type photos. They came out ok, I think.

One of the main attractions in Metamora is the grist mill, which was originally built in 1845.


It is run by the state, and is still used to grind corn.


Some of the old grinding wheels (I think they are called buhrs):

You can't go there and not buy a bag of corn meal.

The lady that worked at the mill was great. Super friendly and very informative!

There's also an old canal (that powers the mill) running through downtown Metamora. There are trains from the Whitewater Valley Railroad that you can ride. They have short or long excursions, including dinner trains.

And of course, with a canal you have to have a canal boat! Today's special was you could ride the boat for just $2!

Downtown Metamora consists of small shops. Several were closed and out of business. Of the shops we did enter, some didn't have much for sale and some of the shopkeepers weren't the most friendly people. There were exceptions to this, of course.

We ate lunch at the Side Track Cafe, which was actually quite good. Anita had one of the daily specials, chicken and dumplings, and she enjoyed it. I had the Reuben sandwich which came with some very good and tender corned beef.

Metamora has an interesting history and is worth visiting for the mill, canal boat and trains. The shops leave a little to be desired, especially compared to Nashville, Indiana.

Friday, August 7, 2009

Lamb Brats

Fired up the grill and threw on a few hot & spicy lamb bratwurst from Viking Lamb Meats. We picked these up at the Binford Farmer's Market, where they often have a booth.

Topped one brat with a manchego cheese/roasted garlic & pepper mix and the other with kraut and just a little mustard. Didn't want to drown out the great bratwurst flavors.

Threw them on some lightly toasted buns and served them with some leftover kidney bean salad. Good eats!

Thursday, August 6, 2009

Zucchini Bread

The neighbor's girls brought us two fine zucchini from their backyard garden. So, I made a few loaves of zucchini bread.

Super easy, and really moist and good, specially when you smear a little butter on a slice!

Printable Recipe

Ingredients:

  • 2 1/2 cups sugar
  • 3 eggs
  • 3 cups flour
  • 3 T vanilla
  • 1 cup oil
  • 2 cups zucchini, grated
  • 1/4 t salt
  • 1 t baking soda
  • 1/4 t baking powder
  • 1 cup nuts (optional)
  • 3 t cinnamon
  • 1 T sour cream

1. Preheat oven to 350°.

2. Combine all ingredients.

3. Pour into two greased loaf pans.

4. Bake for one hour.

My dad's sunflowers

These are the sunflowers in my dad's garden.


If you look to the right of the rake you can see the size of the fully grown heads - a little more than a foot in diameter. Amazing!

Wednesday, August 5, 2009

Smoked fattie nachos

Oh, how we do love fattie nachos!


A fattie is a smoked breakfast sausage roll. You know, like the Jimmie Dean or Bob Evans sausage rolls you see at the grocery store. Any time we fire up our smoker we fill all available space with fatties. They take about 2-3 hours to smoke.

For the nachos, we grind the fatties up and mix them with a can of La Preferida refried beans.

Printable Recipe

You'll need:

  • Tortilla chips
  • 1 16oz can refried beans
  • 1/2 16 oz Fattie, ground
  • 2-3 jalapeños, diced
  • 1 small can, black olives, sliced
  • Cheddar or Mexican cheese mix, to taste
  • Sour cream
  • 2-3 green onions, chopped

1. Lay the tortilla chips out, single layer, on a baking sheet

2. Mix the refried beans and fattie in a bowl. You can either spoon the mixture onto the chips or put it into a sandwich baggie with the end tip cut off and pipe onto the chips.

3. Top with other ingredients except sour cream and green onions.

4. Put into preheated 350° oven for 15-20 minutes until cheese is melted. Top with sour cream and green onions and serve.

Tuesday, August 4, 2009

Kidney Bean Salad

Found a few cans of kidney beans in the pantry that needed to be used up, so I made this salad. Very easy to make, and great tasting.


Printable Recipe

You'll need:

  • 3 16oz cans red kidney beans, drained and rinsed
  • 1 cup onion, chopped
  • 1 cup celery, chopped
  • 1 cup mayo
  • 1/4 cup oil
  • 1 T red wine vinegar
  • 1/4 cup sweet pickle relish, drained
  • 1 pinch sugar
  • S & P

1. Mix mayo, oil, vinegar, sugar, salt and pepper.

2. Add onions and stir well.

3. Add celery, beans and relish and stir.

4. Chill overnight.

Monday, August 3, 2009

Indiana Robotics Invitational

Last Saturday we headed over to Lawrence North High School to see our niece's robotics team compete in the Indiana Robotics Invitational. It was our first time going to a Lunacy match. It was pretty cool.

Basically, teams are given the same parts and are required to design a robot to perform a task. In the Lunacy game, robots are designed to pick up 9" game balls and score them in trailers hitched to their opponents’ robots for points during a 2 minute and 15 second match. Additional points are awarded for scoring a special game ball, the Super Cell, in the opponents' trailers during the last 20 seconds of the match. Lunacy is played on a low-friction floor, which means teams must contend with the laws of physics.

Here, some of the teams are setting up for the next match.

Here, the robots are going at it. For the first 10 seconds the robots operate without human intervention. Then, humans take over and control them remotely, trying to snatch up lunar 'rocks' (balls) and put them in the trailers pulled behind. There's lots of strategy and coordination that goes into each game. It's fast paced and fun!

The matches go fast (3 teams vs 3 teams). There were over 50 teams at the meet. As soon as one match is done, the next teams are lined up ready to compete.

My favorite team (besides our niece's) was the Exploding Bacon team! You can't go wrong with a name like that!

Saturday, August 1, 2009

Grilled Corn Salsa

We made Grilled Corn Salsa today. We went to the Binford Farmer's Market this morning and got fresh corn on the cob and tomatoes. Mike grilled the corn and the tomatoes and I did the rest. It was delicious!


Printable Recipe

Grilled Corn Salsa

  • 5 large ears corn, husked
  • 1/4 cup extra-virgin olive oil, plus more for brushing
  • Salt and freshly ground pepper
  • 4 tomatoes
  • 1/2 cup diced red onion
  • 2 T red wine vinegar, or more to taste
  • 1/4 cup chopped fresh basil leaves

1. Brush the corn with olive oil and season with S&P. Grill until cooked and golden about 15 minutes. Let cool and cut off the kernels.

2. Core the tomatoes and score the bottoms. Brush with olive oil and season with S&P. Place on grill scored side down and on indirect heat. Cook until tomatoes are soft, but not all the way cooked about 15 minutes. Set aside to cool then peel. Cut tomatoes in half, squeeze out the juice and seeds through a sieve into a bowl. Reserve the juices and chop the flesh.

3. Put the onions in a non-reactive medium bowl and toss with 2T red wine vinegar. Let marinate for 10 minutes.

4. Add the chopped tomatoes, tomato juice, onions, basil and 1/4 cup olive oil to the corn. Toss well. Taste and add S&P and vinegar as needed.

5. Serve with tortilla chips.