Thursday, May 31, 2012

Route 11 Chesapeake Crab Potato Chips

I am down to the last flavor of chips in my 5-flavor case from Route 11. They have two other flavors, Sweet Potato and Lightly Salted that will have to wait until my next case, which won't be long.


So, you're thinking... really? Crab boil-flavored chips? Wouldn't that be like biting into a bag of crab boil? Well, no. First of all, I don't think that biting into a bag of crab boil would necessarily be a bad thing, but it'd be rather strong. These chips aren't like that. They have a subtle crab boil flavor, and they still have that fantastic Route 11 crunch and thickness and lack of greasiness. Another great chip!

I'm saving a bag or two of these for the next time I do a crab boil. I'm thinking that'd take it over the top!

Wednesday, May 30, 2012

Grilled Pineapple Salsa

I love fresh pineapple. I'll buy one, cut into large chunks, and munch on it as a snack.


I'll also grill it. Grilled pineapple is great over pork or chicken, or cut into small pieces and made into a salsa, like this one.

Makes: 4 servings
Prep time: 10 minutes
Cook time: 15 minutes
Printable Recipe

Ingredients:

  • 1/2 lime, juiced
  • 1 whole pineapple
  • 1/4 cup red onion, minced
  • 2 jalapeño peppers, minced
  • 2 tablespoons red bell pepper, minced
  • 2 tablespoons green bell pepper, minced
  • 1 tablespoon cilantro, chopped

1. Start up your grill for direct cooking.

2. Cut off the rind and then cut the pineapple into slices. Grill for 3-5 minutes per side or until the pineapple is starting to soften. Let cool for 5 minutes then cut into small chunks. You can substitute pineapple chunks from a can if you wish, but grilling the pineapple really adds a lot of taste.

3. Combine all ingredients. Refrigerate for at least 30 minutes before serving.

Tuesday, May 29, 2012

Route 11 Sour Cream and Chive Potato Chips

I'm not sure how I ever discovered Route 11 potato chips. I think maybe it was on the Food Network. Or maybe someone mentioned them on a forum. Well, no matter how, the good thing is I did because these chips are insanely good.

 
I ordered a case of 5 different flavors in 2 ounce bags. As soon as they arrived I immediately tore open the sour cream and chive bag. Man, these chips are crunchy and sooooo tasty. They aren't doused in weird powdery stuff like the big name brands. No, these chips are flavored perfectly. Just the right amount of chive flavor with a hint of smooth sour cream.

With Route 11 chips you still taste the potato, and you won't come away with greasy hands. The perfect chips!

PS: You don't have to order Route 11 chips just online. Some places now carry them. Go to their website. Maybe you'll get lucky and they're near you. If not, you'll want to order a case... or more!

Monday, May 28, 2012

Mason Jar Salad

We have salad with our dinner just about every night. Sometimes, you want to mix it up a little. Make it  look a little different. These mason jar salads did just that.


The original inspiration came from the Big Red Kitchen. You can put anything you want into them. I used jelly jars since they are big around the base, and have a large mouth, making it easier to get to the salad.

Makes: 3-4 salads
Prep time: 5 minutes
Ingredients:

  • 1 small head romaine lettuce
  • Jars
  • Toppings

1. Cut the bottom off the lettuce. Then, cut it into 2" (depending on how deep your jars are) pieces. Insert the pieces into the jars then top with your desired toppings and serve.

Sunday, May 27, 2012

Route 11 Mama Zuma's Revenge Potato Chips

Get ready for some heat! Oh boy! If you like a really, really hot potato chip, Mama Zuma's Revenge from Route 11 is it!


Route 11 thick chips are fried perfectly. No greasy fingers from these chips, no! And another thing I really like about Route 11 chips is that the flavoring doesn't all come off on your fingers. You know how some chips are... when you're done your fingers are the same color as the chips. I want my flavoring on my chips, not my hands!

I have to say that these are some of, if not the, hottest chips I've ever had. It's a good, flavorful heat, not just a mouth-scalding burn. Great with a grilled burger and a beer!

Saturday, May 26, 2012

Basic BBQ Rub

This is my basic BBQ rub recipe. I use this rub mostly on pork, but it's good on anything.


I use this as a base, and add other flavorings depending on my mood and what I'm cooking. For fish, I might add some lemon pepper. For ribs, I'll add more heat or smoked paprika, or turbinado sugar.

Makes: About a cup
Printable Recipe

Ingredients:

  • 1/4 cup kosher salt
  • 1/4 cup brown sugar
  • 1/4 cup paprika
  • 3 tablespoons black pepper
  • 1 tablespoon garlic powder
  • 1 tablespoon dried onion
  • 1 teaspoon cayenne pepper
  • 1/2 teaspoon celery seeds

1. Combine all ingredients in a bowl. I put the mixture into a spice blender (an old coffee grinder) and pulse it a few times. I store this in a mason jar for months (though it never lasts that long).

Friday, May 25, 2012

Route 11 Salt and Vinegar Potato Chips

My favorite chips are from Route 11. You won't find a crunchier, tastier chip.


Now, I wasn't a big fan of salt and vinegar chips before. Anita would pick up a big of big named chips at the grocery store every once-in-a-while and I'd try one and think I was drinking vinegar out of a bottle and licking a salt lick. The flavor was just too overwhelming for me.

Well, Route 11's salt and vinegar chips are good. Really good. The amount of salt is perfect and the vinegar isn't too much at all. It's a great balance, actually, and has made me a fan of salt and vinegar chips!

Route 11 Barbecue Potato Chips

I continue on my journey of enjoying several of the flavors of Route 11 chips.


Up today is barbecue, and what a treat it is. Smoky sweet barbecue, not in-your-face weird barbecue. Just a hint of heat. Basically, it's like the barbecue I do on my smoker, only crispy and crunchy!

I keep saying "Wow, this is the best chip I've had", but then I pull a different flavor out of my case and think it's the best I've had. The truth is that they are all the best I've ever had!

Get ya some Route 11 chips. And they didn't pay me to say that either. They're just great chips!


Thursday, May 24, 2012

Ham and Cheese Bacon Waffle Sandwiches

Oh, these were tasty! It was hard to stop eating them.


I thought about putting mustard on these, but I couldn't bring myself to do it. Somehow the idea of mustard on a waffle didn't work for me.

I baked these off in the oven, but you can also put a little butter in hot skillet and brown them that way.

Makes: 4-6 servings
Prep time: 5 minutes
Cook time: 30 minutes
Printable Recipe

Ingredients:

  • 4 slices thick-cut bacon
  • 1 1/2 cups all-purpose flour
  • 1 teaspoon baking soda
  • dash of salt and pepper
  • 2 eggs
  • 1 tablespoon extra-virgin olive oil
  • 1 2/3 cups buttermilk
  • cooking spray
  • 4 slices sharp cheddar cheese
  • 8 thin slices black forest ham
  • Dill pickle slice or maple syrup, optional, for serving

1. Preheat your oven to 425 F. Preheat your waffle iron.

2. Cook the bacon. Drain well. Crumble.

3. In a large bowl, combine the flour baking soda, salt and pepper. Make a well in the middle and add the eggs, oil, buttermilk and crumbled bacon. Break up the yokes then whisk the batter together until smooth.

4. Make waffles per your waffle iron instructions.

5. Top two of the waffles with ham and cheese. Add the other waffles on top. Place on a baking sheet and put into the oven until golden brown and the cheese starts to melt.

6. Serve with a pickle or drizzle with syrup.

Monday, May 21, 2012

Fiery Pork Tenderloin Sliders with Avocado Cream and Roasted Poblanos

On a rare occasion, I make up my own recipes. That's actually my (eventual) goal: that everything I cook be my interpretation or adaption of things I've seen or tasted. But, I'm a ways away from that goal. I am getting there, though.


These simple tasty sliders have bring some heat, but the avocado cream will cool you off.

Makes: 10-12 sliders
Prep time: 4 hours
Cook time: 1 hour 30 minutes
Printable Recipe

Ingredients:

  • 8 dried guajillo chili peppers
  • 1 pork tenderloin
  • 4 poblano peppers
  • Avocado cream sauce (see below)
  • 10-12 slider rolls

1. Heat a large skillet over high heat. Add the peppers. Toast until they start to blister.

2. Transfer the peppers to a large bowl. Cover with hot water and let soak for 30 minutes.

3. Remove the peppers, but DO NOT throw out the water. Remove the stems, veins, and seeds (if desired) and place into a blender. Add 2-3 cups of the soaking liquid. Puree until smooth. Add more liquid if the mixture gets too thick.

4. Place the tenderloin into a large resealable baggie. Add the blended sauce. Place the baggie into a large bowl (in case it leaks) and place in the fridge for 3 1/2 hours.

5. Set up your grill for indirect cooking.

6. Place the poblanos onto the grill and roast until well charred. Remove from heat and let cool. Remove the charred skin, seeds, stems and veins, and cut into wide pieces. Set aside.

7. Sear the tenderloin over direct heat on all sides. Remove to indirect heat and cook until internal temperature reaches at least 155 F. Remove and cover in foil and let rest for 30 minutes. Slice thin.

8. Serve tenderloin on slider rolls topped with poblano slices and avocado cream.

For the avocado cream sauce (from the Eat Clean Now blog):

Ingredients:

  • 1 avocado, pitted, peeled and cut into chunks
  • 6 ounces plain Greek yogurt
  • 1 jalapeño pepper, seeded, stemmed and minced
  • 1/4 cup fresh cilantro, chopped

1. Place all ingredients into a blender and puree until smooth. Refrigerate until ready to use.

Sunday, May 20, 2012

Fort Harrison State Park

Anita and I took a few days off work and goofed off around the house and yard. One day, when the weather was particularly nice, we went down to Andre's BBQ and grabbed some lunch (pulled pork sandwiches with sides). From there we headed on over to Fort Harrison State Park.
Fort Harrison was once an active army base. It is now a 1700-acre state park convenient to just about anywhere in the Indy area. It's a really great place, with an 18-hole golf course, an inn, walking paths, riding stables... fun for everyone!


After lunch near Delaware Lake we headed down one of the several hiking trails in the park. The Fall Creek trail snakes along Fall Creek. It's a very nice walk, mostly flat, and in some areas a little hilly.


I took some pictures along the trial and Delaware Lake, where there were a few people fishing that day.


After our walk we drove around the park for a bit, and ended up at the Museum Of 20th Century Warfare, a small but well-done museum staffed by volunteers. They have several interesting displays, many of which are loaned to the museum by veterans.

Fort Harrison is a really nice state park and we're lucky to have it so close to Indianapolis. If you're in the area, swing by and enjoy a day at the park!

Saturday, May 19, 2012

Hickory-Grilled Bacon-Wrapped Pork Tenderloin Medallions

We're big fans of pork tenderloin. It tastes better than chicken breasts, cooks easy, and its easier to wrap in bacon!


I grilled these over lump charcoal, with a chunk of hickory thrown on top for extra flavor. They came out fantastic.

Makes: 2-3 servings
Prep time: 10 minutes
Cook time: 30-40 minutes
Printable Recipe

Ingredients:

  • 1 pork tenderloin, trimmed
  • 6-8 slices of thick-cut bacon

1. Fire up your grill for direct and indirect cooking. Soak some small bamboo skewers in water.

2. Par cook the bacon by placing it into the microwave for a minute on paper towels. You don't want to fully cook it. If you don't do this step the bacon won't cook enough on the grill. I partially cooked mine in a cast iron skillet because I keep the leftover bacon grease to season my grill grates.

3. Cut the pork tenderloin into medallions, about 1 1/2" thick. Season well with salt and pepper.

4. Wrap the bacon around the medallions and secure with the skewers. You can use toothpicks, but they will burn off.

5. Sear pork over direct heat. Move to indirect heat and continue cooking until done, about 155-160 F. Let rest 10 minutes before serving.

Friday, May 18, 2012

Gumbo

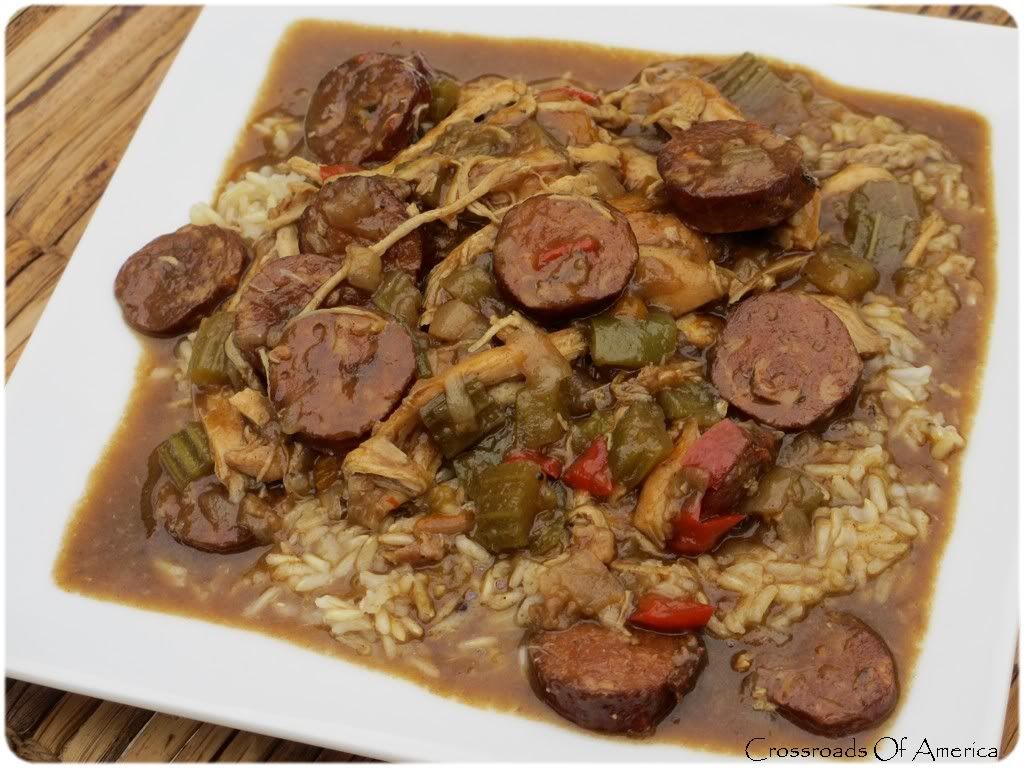
I love a good gumbo. I've made several variations in the past. I came across this version from Chef Frank Brigtsen, and I just had to make it. It takes a lot of time, but it is by far the best gumbo I've ever had. You could shortcut some of the process (say, by using rotisserie chicken or store-bought chicken broth), but I don't think you'll be as happy with the end result.


I found some very good andouille at Whole Foods. I admit, I used more than the original recipe called for because I'm addicted to andouille. I made a few other very minor changes also.

Makes: 8-10 servings
Prep time: 1 hour
Cook time: 4 hours
Printable Recipe

Ingredients:

  • 1 pound (or a little more) andouille sausage, sliced into 1/4" thick rounds
  • 2 tablespoons olive oil
  • 4 cups yellow onions, chopped
  • 3 cups celery, chopped
  • 1 cup green bell pepper, chopped
  • 1/2 cup red bell pepper, chopped
  • 1/2 cup yellow bell pepper, chopped
  • 2 bay leaves
  • 1 tablespoon garlic, minced
  • 4 teaspoons salt
  • 1/4 teaspoon dried thyme
  • 1/2 teaspoon black pepper
  • 1/4 teaspoon white pepper
  • 1/4 teaspoon cayenne pepper
  • 3 tablespoons gumbo file powder
  • 12 cups homemade chicken stock
  • 1 whole chicken, cut into parts
  • 4 tablespoons Creole seasoning (I used Slap Ya Mama)
  • 3 cups all-purpose flour
  • 4 cups vegetable oil
  • 4 cups cooked rice

1. Preheat your oven to 350 F. Place the sausage slices onto baking pans and bake until they are starting to brown on the edges, 30-45 minutes. Remove from oven.

2. Heat the olive oil in a very large pot over medium high heat. Add in 3 cups of the onion, 2 cups of the celery, and 1 1/2 cups of the peppers. Also add the bay leaf. Cook until the onions start to brown, 15-20 minutes.

3. Add the remaining onion, celery and bell pepper. Reduce heat to medium and cook another 2-3 minutes or until the onion you just added starts to turn clear.

4. Stir in the garlic, salt, thyme, black and white pepper, cayenne, and file. Reduce heat to low and cook another 3-4 minutes.

5. Add in the chicken stock and sausage. Bring to a boil and reduce heat to a simmer. Cook for 1 hour, stirring occasionally and skimming off any oil off of the surface.

6. Meanwhile, heat the vegetable oil over medium high heat. Combine 2 cups of the flour and 4 teaspoons of Creole seasoning in a shallow bowl.

7. Season the chicken with Creole seasoning. Working in batches, dredge the chicken in the flour mixture and fry until brown and crispy, about 5 minutes per side. Remove to a paper towel lined plate.

8. Add the chicken to the pot and continue simmering another 45 minutes or until the chicken is done and is starting to fall off of the bone.

9. Remove the chicken pieces and let cool. Remove the skin. Remove the meat from the bones and shred.

10. Once the oil from frying the chicken has cooled slightly, pour the oil through a sieve. You need just over 3/4 cups of oil to make a roux.

11. Heat the frying pan and add the oil back in. Slowly whisk in 1 cup of the flour. Bring to a simmer, and stir constantly for 15-20 minutes or until the roux is the color of brown chocolate. Remove from heat and let cool for 15 minutes.

12. Bring pot back to a boil and skim off any oil.

13. Slowly add the roux to the pot, stirring constantly. Reduce heat to a simmer and simmer another 30 minutes.

14. Serve over cooked rice.

Thursday, May 17, 2012

Tijuana Flats

Amazon now has a service much like Groupon or Living Social, called Amazon Local. A recent offer was for Tijuana Flats, a Tex-Mex restaurant chain in Florida, Pennsylvania, Virginia, North Carolina and Indiana.


Most people use restaurant coupons to save on the meal, never to return. I use them to experience new restaurants we didn't know about. One was His Place Eatery, one of our favorite places to eat.

Tijuana Flats is now another favorite place for us to eat. They serve the freshest ingredients and they have an great little hot sauce bar that has sauces ranging from the very mild to the very hot. Sadly my picture come out blurry, but you get the idea. You grab some little cups and fill them with whatever sauces you want.


I ordered the Tres Tacos, beef, loaded, with refried beans and rice. The tacos were huge, the toppings fresh, and the meat was seasoned well. The sides were also great. I made a few trips to the hot sauce bar to try out some different sauces, which I liked being able to do.

Anita had the enchiladas, which she also enjoyed. Everything was tasty.

Service was prompt and courteous. We'll be returning to Tijuana Flats soon, and often. Another Amazon Local success for us!

Wednesday, May 16, 2012

Smoked Sea Turtle Eggs with BBQ Sauce

Chris over at the Nibble Me This blog cooks up a lot of great food. Like these smoked (or grilled) sea turtle eggs. Ok, they aren't really sea turtle eggs. They're a great (and I think better) variation on smoked armadillo eggs. Ok, they aren't really armadillo eggs either.


I made only minor changes to the original recipe from Chris.

Makes: 4 servings (or two because they're really good!)
Prep time: 20 minutes
Cook time: 1 1/2 hours
Printable Recipe

Ingredients:

  • 1 pound roll breakfast sausage
  • 1/2 cup whipped cream cheese
  • 1/2 cup shredded cheese (whatever kind you prefer)
  • 2 jalapeños, seeded and minced (or use habaneros, if you dare)
  • 1 1/2 tablespoon BBQ rub (we used our basic rub)
  • BBQ sauce, warmed, for dipping

1. Set up your charcoal grill for indirect grilling at 250 F. Or use your smoker.

2. Put the sausage into the freezer for about 10 minutes. This will make it easier to slice.

3. Combine the cream cheese, shredded cheese, jalapeños and 1/2 tablespoon of the rub in a small bowl.

4. Cut the sausage into slices. You'll get about 10 out of a roll. Gently flatten each slice just a little (it'll be about 3 1/2" round). You don't want it so thin that it comes apart when you roll it up.

5. Place about a tablespoon of the cheese mixture into the center of each sausage. Roll up the edges to form a ball.

6. Sprinkle the balls with the remaining rub. Grill over indirect heat (or smoke) for 90 minutes or until the sausage is done.

7. Serve with warmed BBQ sauce for dipping.

Monday, May 14, 2012

Mixed Grill

My favorite part of this dish is the fantastic tasting chicken. Well, ok, that and the grilled smoked sausage.


I found the original recipe over on the Recipe Secrets site. I added a few par-boiled and then grilled baby potatoes.

Makes: 6-8 servings
Prep time: 3 hours
Cook time: 30 minutes
Printable Recipe

Ingredients:

  • 1/4 cup extra virgin olive oil
  • 5 lemons, 3 juiced and 2 halved
  • 1 teaspoon salt
  • 3 bay leaves, crushed
  • 2 large garlic cloves, minced
  • 2 tablespoons fresh rosemary, chopped
  • 2 pounds boneless, skinless chicken breasts
  • 1 pound smoked sausage
  • 1 pint cherry tomatoes
  • 3 lemons, cut in half
  • 10 baby potatoes

1. Combine the oil, lemon juice, salt, bay leaves, garlic and rosemary in a small bowl.

2. Place the chicken in a large resealable baggie. Pour in the marinade. Seal and place in the refrigerator for 3 hours. Meanwhile, soak some bamboo skewers in water or just use regular wire or metal skewers.

3. Fire up your grill for direct and indirect cooking.

4. Bring a large pot of salted water to a boil. Add the potatoes. Cook until almost tender. Remove and drain.

5. Cut the chicken into 3/4" thick strips and feed onto skewers.

6. Cut sausage into 3/4" thick strips and feed onto other skewers.

7. Feed tomatoes, lemons, and potatoes onto other skewers.

8. Place all skewers over direct heat until lightly charred. Remove to indirect heat and cook until the chicken is done and the sausage and vegetables are heated thoroughly.

9. Serve with all ingredients piled high, family style, with lemons for drizzling.

Sunday, May 13, 2012

Jamaican Jerk Sliders

I'm a big fan of Caribbean flavors. I keep a bottle of Shizzle sauce on hand for when pork tenderloins go on sale. I slather them up, let them get happy for a bit in the fridge, then toss them on the grill.


Slice them thin onto slider buns and top with a kicked up Jamaican slaw! Good eats!

For the sliders:

Makes: 8-10 sliders
Prep time: 4 hours
Cook time: 20 minutes
Printable Recipe

Ingredients:

  • 1 pork tenderloin
  • 1 cup Shizzle marinade
  • 2 cups Jamaican slaw (see below)
  • 8-10 slider buns

1. Slather the tenderloin in the marinade. Cover and refrigerate for at least 4 hours.

2. Fire up your grill for indirect cooking. Sear the tenderloin over direct heat then move to indirect heat and continue cooking until internal temperature reaches at least 155 F.

3. Wrap meat in foil and let rest 15 minutes. Cut into 1" thick pieces. Serve on slider buns topped with slaw.

For the slaw:

Prep time: 15 minutes
Cook time: Overnight

Ingredients:

  • 1 small head purple cabbage, finely chopped
  • 10 jalapeños, minced
  • 1 large red onion, minced
  • 6 large cloves garlic, minced
  • 6 radishes, grated
  • 2 tablespoons cilantro, minced
  • 6 limes, juiced
  • 1 teaspoon salt
  • 1 teaspoon black pepper
  • 1 teaspoon cumin
  • 1 teaspoon paprika

1. Combine the vegetables in a large bowl. In a separate bowl, combine the lime juice and seasonings. Pour over the vegetables and stir to combine.

2. Cover and refrigerate overnight before using.

Saturday, May 12, 2012

Restaurant-Style Salsa

This is exactly like the salsa you get at most Tex-Mex restaurants around here. It's very easy to make, and hard to stop eating.


Some restaurants use more tomato, some use less. Just depends on how thick they want it. This makes a really big batch, but it sizes down easily.

Makes: 6 or so cups
Prep time: 10 minutes
Cook time: 5 minutes
Printable Recipe

Ingredients:

  • 1 (28 ounce) can whole tomatoes
  • 2 (10 ounce) cans Rotel (I used one hot and one mild)
  • 1/4 cup white onion, chopped
  • 1 clove garlic, minced
  • 1 jalapeno, chopped
  • 1/4 teaspoon sugar
  • 1/4 teaspoon salt
  • 1/4 teaspoon ground cumin
  • 1/2 cup cilantro (or more)
  • 1/2 lime, juiced

1. Place all ingredients into a large blender. Pulse until you get the consistency you're after. Taste and add more seasonings if desired.

2. Refrigerate at least one hour before serving.

Wednesday, May 9, 2012

Rice Krispies Treats Biscotti

This is such a great idea. I found it on the Big Red Kitchen site.

Everyone loved how these looked. I took a big batch over to the neighbor's on Easter.


They're actually quite easy to make. The original recipe used melted chocolate instead of Wilton's candy melts. I might try the melted chocolate with red and green sprinkles around Christmas time.

Makes: 18 or so treats
Prep time: 5 minutes
Cook time: 30 minutes
Printable Recipe

Ingredients:

  • 1 stick unsalted butter
  • 2 10 ounce bags large marshmallows
  • 12 cups Rice Krispies cereal
  • 2 packages Wilton’s candy melts (I used white)
  • Sprinkles

1. Place the butter into a very large pot. Melt over medium-high heat. Brown just slightly.

2. Reduce the heat to low. Add the marshmallows. Stir until melted.

3. Stir in the cereal and stir until completely covered.

4.  Cut a piece of parchment paper just slightly larger than 25 x 7 inches. Spray lightly with cooking spray.

5. Pour the cereal mixture out onto the parchment paper. Using your hands, form into a 25 x 7 inch rectangle. Press down hard with the palms of your hands to pack the cereal tightly. Let cool until completely set.

6. Cut the cereal into bars. I ended up cutting the rectangle in half lengthwise, then into 1" wide sticks.

7. Melt the candy per the package instructions. Pour into a tall plastic cup. Dip the cereal sticks into the melted candy, shake off the excess, and transfer to parchment paper. Sprinkle with the sprinkles and let set.